
Whether you’re a fishing enthusiast, a beginner paddler, or just tired of wobbly rides, building your own DIY kayak stabilizer is a game-changer. With the right tools and know-how, you can dramatically increase your kayak’s stability without spending hundreds on commercial outriggers. In this guide, you’ll learn exactly how to make one, why it’s useful, and how to ensure it performs flawlessly in all types of waters.
- Why Make a DIY Kayak Stabilizer?
- Materials Needed for a DIY Kayak Outrigger
- How to Build a DIY Kayak Stabilizer: Step-by-Step
- Common Mistakes to Avoid When Making DIY Kayak Outriggers
- How to Stabilize DIY Kayak Stabilizer for Choppy Waters
- Alternative DIY Canoe Outrigger Options
- Pros and Cons of a Homemade Kayak Stabilizer
- DIY vs Store-Bought Kayak Stabilizers
- FAQs About DIY Kayak Stabilizers
- Final Thoughts: Build Smarter, Paddle Safer
Why Make a DIY Kayak Stabilizer?
Better Balance Without Breaking the Bank
Store-bought kayak outriggers can cost upwards of $200, but a homemade kayak stabilizer made from PVC, pool noodles, or foam floats can offer the same results for a fraction of the price.
Perfect for Fishing, Photography, and Beginners
Whether you’re casting a line, snapping wildlife shots, or just learning the ropes, a stabilizer helps reduce the chances of tipping over—especially when moving around or dealing with rough waters.
Materials Needed for a DIY Kayak Outrigger
Before jumping into the build, here’s what you’ll need:
- 2 PVC pipes (1.5” diameter, ~4 ft each)
- 2 foam floats or large pool noodles
- 2 T-joints or angled brackets for mounting
- Stainless steel bolts and washers
- Drill and wrench
- PVC glue or waterproof adhesive
- Bungee cords or zip ties (optional for added support)
These materials are cheap, easy to find, and perfect for creating a lightweight yet sturdy setup.
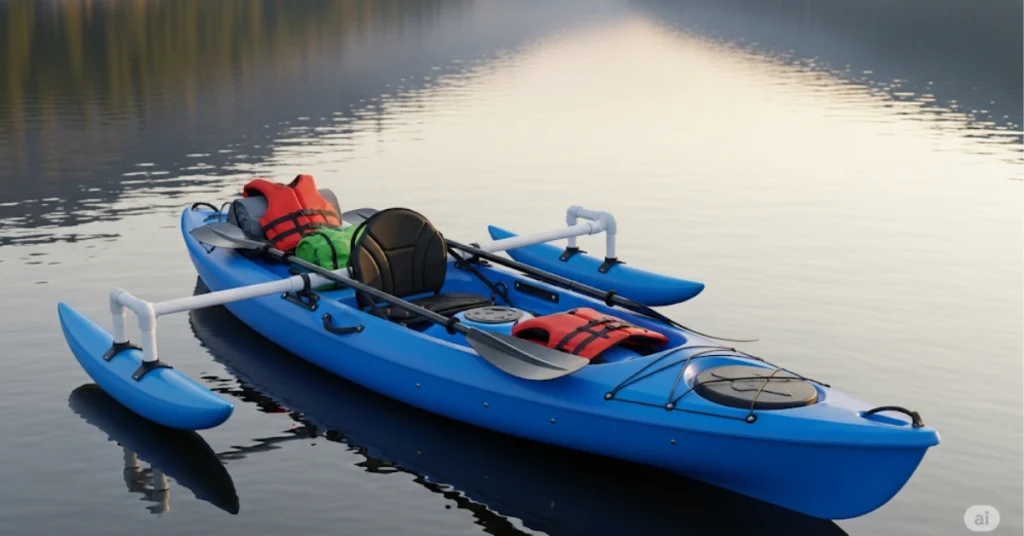
How to Build a DIY Kayak Stabilizer: Step-by-Step
Step 1: Prepare the Floats
Cut the foam noodles or floats to your desired length—usually around 2 to 3 feet per side. Ensure they’re symmetrical to maintain balance on both sides.
Step 2: Assemble the PVC Arms
Cut the PVC pipe into two equal lengths (about 3-4 feet each). These will act as the arms extending from your kayak to the floats. Use T-joints or brackets at one end to secure the arms to your kayak.
Step 3: Attach the Floats
Insert each PVC arm into the center of a foam noodle or secure them to a float using waterproof adhesive. For extra durability, drill through the foam and secure it with bolts and washers.
Step 4: Mount to the Kayak
Identify a spot behind your seat or near the rear tank well to attach your outrigger arms. Drill holes if necessary and secure the brackets tightly using stainless steel bolts. Make sure the stabilizers are level with or slightly above the waterline when not under load.
Step 5: Test and Adjust
Take your kayak out on calm water first to test stability. Adjust the height, length, or positioning if needed. You want stability without creating drag.
Common Mistakes to Avoid When Making DIY Kayak Outriggers
1. Incorrect Float Placement
Too high or too far back can reduce their effectiveness. Ensure they’re parallel and equidistant from the kayak.
2. Weak Mounting Hardware
Avoid using plastic screws or low-quality bolts. Stainless steel is non-corrosive and reliable for aquatic use.
3. Overcomplicating the Design
Keep it simple! A straightforward diy kayak outrigger works just as well as a complex one—sometimes even better.
How to Stabilize DIY Kayak Stabilizer for Choppy Waters
If you’re paddling in waves or currents, stabilize your system with:
- Cross-bracing between arms
- Using wider floats or hollow pontoons
- Adding bungee support to reduce sway
This can dramatically improve performance, especially when paddling offshore or during windy days.
Alternative DIY Canoe Outrigger Options
If you’re working with a canoe instead of a kayak, the same principles apply. Canoes are typically less stable, so you might need larger floats or dual-arm support for balance. Try a diy canoe outrigger with foam-filled PVC pipe pontoons for better buoyancy.
Pros and Cons of a Homemade Kayak Stabilizer
✅ Pros:
- Cost-Effective: Under $50 in most cases
- Customizable: Adjust length, float size, or material
- Easy Repairs: Replace or modify components easily
❌ Cons:
- Less Aesthetic: May look homemade
- Durability: May not match commercial-grade stabilizers without quality materials
- Trial & Error: Might need fine-tuning after water testing
DIY vs Store-Bought Kayak Stabilizers
| Feature | DIY Kayak Stabilizer | Store-Bought Stabilizer |
|---|---|---|
| Cost | Under $50 | $150–$300 |
| Custom Fit | Highly customizable | Limited to model specs |
| Durability | Depends on materials | Generally more durable |
| Ease of Setup | Moderate (DIY skills needed) | Plug-and-play setup |
| Appearance | Looks homemade | Sleek and polished |
FAQs About DIY Kayak Stabilizers
How to stabilize DIY kayak stabilizer on rough water?
Use larger floats, install cross-bracing, and secure mounting points tightly. Try testing it on calm water first before hitting waves.
Can I use this on an inflatable kayak?
Yes, but be cautious—only use clamps or strap-on attachments. Avoid drilling into inflatable surfaces.
What’s the best float material?
Closed-cell foam and sealed plastic floats offer the best buoyancy. Pool noodles are okay for calm waters but not long-term.
Final Thoughts: Build Smarter, Paddle Safer
Creating your own DIY kayak stabilizer isn’t just smart—it’s satisfying. With some PVC pipe, floats, and a bit of elbow grease, you’ll have a custom stabilizer that rivals any store-bought option. Whether you’re kayak fishing, touring, or just learning, this homemade system can help you paddle with more confidence and comfort.
So go ahead—give your kayak a stability upgrade and enjoy smoother, safer adventures out on the water.